Archaeological Research Database User Guide
Research Photo Database
In the Crow Canyon Archaeological Research Database page, you can access photos for sites we have researched over our nearly 40-year history. This page displays brief information about the images stored in the database. The data from the images that are available to search include:
- Site Name
- File Name
- Date of Photo
- Description
- Copyright

Search the Photo Database
To search the database, fill in the keywords of the photo you want to find in the field. To search, follow the steps below:
![]()
- In the QuickFind field, type a keyword you’d like to search. For example, to search for all photos whose description contains “axe,” enter the word “axe” in the box and press the “Enter” on your keyboard.

- After that, the database will display all photo data that contains the word “Axe.”
- You can also find out the number of photos shown on the page.

Advanced Photo Search
You can perform more specific data searches by filling in keywords that pertain to a particular field. You can also perform searches by combining several keywords in several search fields. Sample search fields that you can use include:
- Site Name, Use this option to view all photographs of a specific site by the Smithsonian Trinomial designation or the common name for the site.
Example: To see photos from the Albert Porter Site, search for “5MT123” or “Albert Porter.” - File Name, Use this option to select an image by the record number. Please be aware that a search for ‘101’ will match ‘1101’ and similar variations.
Example: 4097 - Text Description, Use this option to select photographs that include a search term in the description field.
Search terms that refer to specific Study Units (e.g., ‘101’ for ‘Structure 101’), features (e.g., ‘Feature 3’), or artifacts (e.g., ‘baskets’) will return all records with the term in the description.
Example: Mancos Corrugated
Example: Structure 1019 - Copyright Text, It can be convenient to search for all photos taken in a given year here.
Example: 1997
To perform an advanced search, follow the steps below:
- On the Crow Canyon Archaeological Research Database page, click the
 button.
 - Then the side menu will be shown

FIGURE 3 SEARCH FIELD ON SIDE MENU
- Click the
 button to clear the data for all the fields that you have filled in.
 - Press the
 button to cancel the action and close this side menu page.
 - Input the keywords on the field you want, then click
 button. The system will display the photo according to the keywords filled in the search field.

FIGURE 4 SEARCH RESULT
View Photo Detail
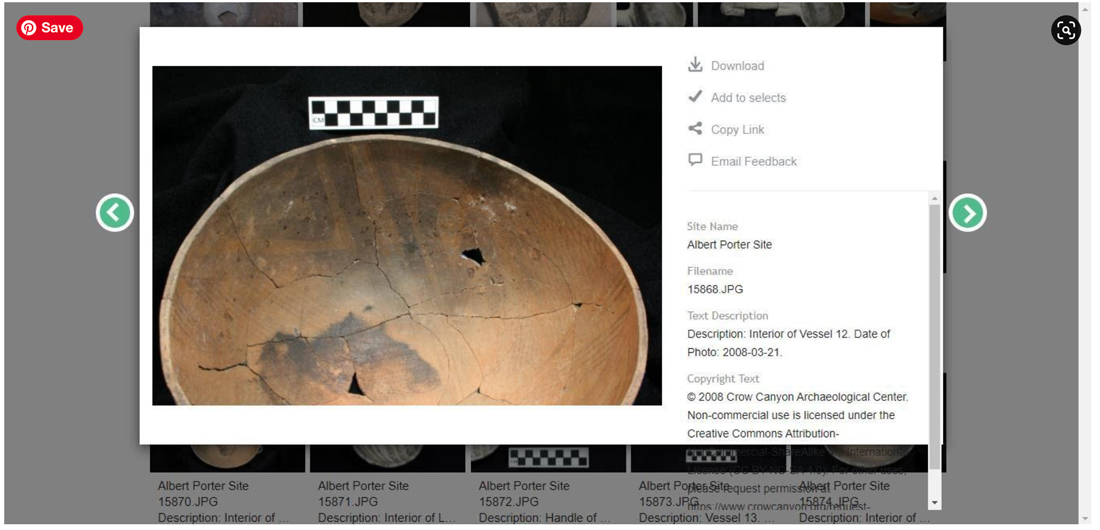
- Click the photo for which you want to view details.

FIGURE 5 PHOTO DETAIL PAGE
- Press the
 and
and  button to move to another photo detail page.
 - To copy the URL of a photo, press the
 button. Use this photo URL for direct access to the photo detail page.
 - To contact us regarding a photo, use the
 button.
 - You can send an email containing photo feedback via email by pressing the
 button. An email will open in your default email program, depending on your system configuration.
Downloading an Image
You can download images by using the download button on the main photo database page or the photo detail page(see figures).
FIGURE 6 DOWNLOAD ICON ON DATABASE PAGE
FIGURE 7 DOWNLOAD BUTTON ON PHOTO DETAIL PAGE
Download Multiple Images
You can select multiple images for download by adding them to a section. To choose a photo click the button ![]() on the photo detail page. If the photo has been selected, then the color in the field will change to
on the photo detail page. If the photo has been selected, then the color in the field will change to ![]() .
.
-
- In the main photo database view, you can also click the
 icon on the photo you want to add to your selection. The icon will again
  turn green in color, indicating that the image is selected.
 - You can see a description of the number of photos selected for download in
 button.

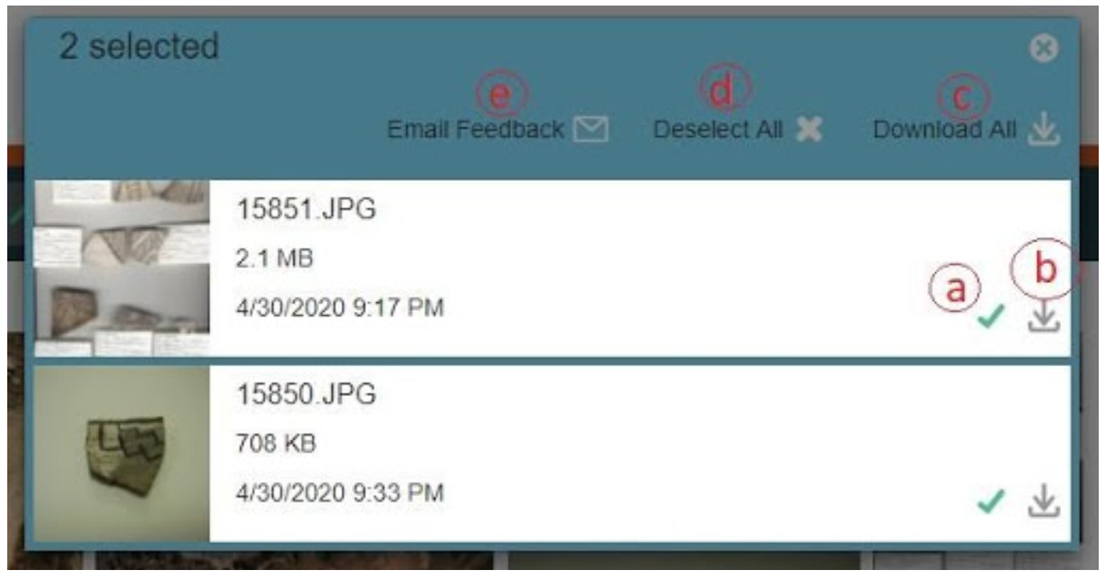
FIGURE 8 SELECTED IMAGE
- After finishing your selection, click the
 button. Then the database will show a pop-up page:

- In the main photo database view, you can also click the
FIGURE 9 POP UP PREVIEW PAGE
- On the pop-up preview page, you can see the following information:
- Click this
 icon to remove a photo from the list of photos you want to download.
 - Click this
 icon to download one photo.
 - To download all selected photos from the list, click the
 button.
 - To remove all selected photos, click the button

- To send email feedback for all photos on the list. Click the
 button. An email will open in your default email program, depending on your system configuration.
- Click this
- If all the photos you want to download are listed, click the
 button. The system will display a pop-up page confirming the format of the photo file you want to download.

FIGURE 10 PHOTO FORMAT CONFIRMATION PAGE
- You can choose between downloading the photo in the original format or JPEG.
- Click the
 button to download all photos on the list according to the selected photo format. All the selected files will be downloaded and saved in .zip.


